Showing posts with label shelves. Show all posts

Saturday, March 24, 2012

George Carlin Was Right About.....Our "Stuff"

A long time ago the late comedian/satirist/truth-teller, George Carlin, had a very funny routine he did on our insatiable need for "stuff'.   Well, truthfully, I am pretty sure he used another ---shall we say---more colorful word for it.    The gist of the whole routine (which nearly everyone in modern society can relate to) is that we ALL have stuff and that can lead to all kinds of problems.    Like where to put our stuff.  Or storing stuff.   Or hiding stuff (valuables).    Oh, and one other thing is that it leads to containers for our stuff.    You know what I'm talking about, I am sure.  

If there is one thing we have plenty of in this country (USA), it's an abundance of containers for our stuff.   Big ones, tiny ones, rented spaces, crammed places and whole stores that cater to one audience: People in search of the perfect thing to contain their stuff.   

So it should come as no surprise that one day while browsing on Craig's List, Larry came across an irresistible listing.    It was a used (but still perfectly functional) Rubbermaid storage building.  They sell them at Lowe's, Home Depot and Wal-Mart to name only a few of the places that carry these storage buildings.    He had looked at them numerous times at Sam's Club where they had the MOTHER of all snap-together, molded plastic storage buildings that was big enough to live in if you had the good sense to get rid of some of your stuff.    It actually had windows, a sky light, places to put shelves, faux flower boxes on the outside and a rather realistic looking "barn door".    I wouldn't have been surprised to find out that it had instructions for installing electricity, running water, a toilet, draft beer on tap, and a satellite dish.   I guess if they had marketed that thing as the ultimate "man cave", they would have sold out the first day they had them.   

Needless to say, he was not charmed by the rather large price tag that went along with that building so he sighed heavily and continued his search.    He needed a small outside shed because most of his yard tools were in the garage or leaned rakishly against the end of the house, where they were exposed to sunlight, rain, hail or to tempt the passing would-be thief.    (Yea, like someone is going to steal your rusted, bent up rake!  But I digress......)  

So when he came across the one for sale on Craig's List, his eyes lit up.    The price was right, it snaps apart so bringing it home would not be a huge issue and the pile in the garage and end of the house had grown intolerable.   He called the guy selling it and before you know it, he had it home and re-snapped back into a functional storage shed.    Problem solved----sort of.  


Those of you who have sheds know what I am going to say next.    A short time after he got the shed we had one of our famous hurricane warning things that we get usually once or twice a summer.   Sometimes they materialize into the real deal (Ivan, 2004).   Sometimes we just get a lot of rain and not much else.  No matter which kind it turns out to be, we still have to go through the drill of putting all the yard art, lawn chairs, loose anything into a suitable place until things literally blow over.    So he ran around like all the rest of the people in town, throwing things at the Rubbermaid bin willy, nilly and trying to strip our yard of anything that can be turned into a projectile in a 100+ mph wind.    We've seen what perfectly innocent things can do when they go flying about the yard and cartwheeling within inches of our bay window.     You do not need to tell us twice that loose things must be tied down or put in a closed container when a storm approaches.   

Well, that was several years ago and while the storm we were preparing for never materialized, we somehow forgot about all that stuff in the Rubbermaid building.    I think he might have retrieved one or two flower pots but the vast majority of the things in it basically served as a home for the tiny tree frogs that came to inhabit and LOVE the little storage shed.   

Now that we've retired from our "day jobs", Larry has a lot more time to ponder things that he can do to improve the old homestead.     And so it was that he happened to go by the shed the other day and he casually opened the doors and took a peek inside.    It was pretty much crammed to it's green, plastic fake rafters with all that stuff he put in there a while back.   Neither of us could remember when it was so suffice it to say, it was several summers ago.    And it hit him that the stuff he had squeezed into the back of the shed was impossibly trapped behind bags of potting soil, mystery boxes, lumber, rakes, flower pots of all kind, yard art and a rather large family of tree frogs, staring at him with bulging eyes wondering what he intended to do next.  

He had only one choice----well, maybe two choices.    He could-----gasp----get rid of all that stuff!   Or he could organize it a tiny bit better!    And that is the choice he decided to make.    Among the piles of stuff he had in the garage was a haphazard stack of pallets---The kind that many stores use to hold their merchandise in a warehouse.   When deliveries are made, often a forklift will pick up the whole pallet and move the entire thing to the warehouse.  They are made of cheap wood and nailed or stapled together quickly and without a lot of thought to design, other than functionality.    He had asked a friend to save some for him since his friend happens to work in a place that gets these pallets so much that they have to dispose of them.    A fresh supply arrives almost daily.   

Now it so happens that using pallets for "re-purposing" is all the rage.    You can look on Pinterest, do a search for "pallet furniture" and you'll find that there are a lot of creative souls out there who have found new and interesting ways to use these pallets to make coffee tables, wall art, shelving and almost anything you can think of that involves wood and nails or screws.    They take the pallets apart, cut them up into useful boards and without too much expense have some pretty cute and almost indestructible furniture.   

Larry had been collecting the pallets for some time as a free source of wood for just such a project as improving his little shed.    And after I sent him several links to projects made using pallets as the raw materials, he got inspired to make some shelves for his shed. 

First, he had to cut the wood down into some usable sizes.    He set up a cutting area outside of the garage and got out his Skil Saw.     He also kept a crowbar handy since the nail -brad thingies they use and the methods they employ to put those pallets together make them really sturdy.   


Keep a crowbar handy for prying
A Skil Saw will save time and work
After he got the pallet torn apart into usable parts, he used wood screws and some carpenter's glue and some other odd pieces of wood that were taking up space in the garage and fashionedthem into a serviceable set of shelves.    The estimated investment for the entire project was $5.00 and his time.  


No, they aren't for House & Garden but they work just fine!
Then he reloaded the shed with all the stuff that had come out of it.   Before the shelves were added, in order to get to things in the back, he had to practically unload the entire shed.   Now, with shelving at the back and a few thing neatly piled up toward the front, he can actually step inside, greet the frogs and get to anything on the back shelves.     He might have to move an item or two, but the things stored there are much more accessible and less frustrating to pull out.   


Potting Soil, Coolers, Screen House and assorted stuff
Flower Pots and yard art
                                                  
Rubbermaid Storage Bin reloaded. (The tree frogs are in hiding!)
So yes, what George Carlin said is definitely true about humans and their stuff.    From what I have seen with my grandchildren, we start at an early age acquiring stuff and the quest apparently continues until we finally get enough of it and start downsizing.    We have not quite reached that stage in our lives, although we have given away, donated or tossed a large amount of things from our house since retirement last year.    Until we arrive at that time in our lives when we start divesting ourselves of stuff instead of investing in it, we need to figure out smarter, more efficient ways to store all of our good stuff.   

I'll bet you have some things that could be stored better, too.     We all do, or so it seems.    If you have a brilliant, cheap or innovative idea about how to store stuff, please share on the comment section.     I am sure George would approve from wherever he is now.     ;)
Happy Trails,

Marcia 


Thursday, December 8, 2011

Tackling a Black Hole

Perhaps you have one in your home.    I think there must be at least one in every dwelling.   You will know what I am talking about shortly.    I refer to ours as a Black Hole.   In most homes these days we have places where we euphemistically "store" things.     Sometimes these places are closets.   Other times they are the so-called junk drawer.     On larger scale they are our garages and out buildings.    For today's blog entry I am referring to that dark, dense place known as our pantry.     

When we moved in this house in 1994 our galley type kitchen had a pantry----basically a closet with shelves and a door to hide it all.     I was happy, at first, because it was a pantry separate from the other cabinets.     It seemed like an enormous amount of space to put cans of baby corn, sacks of dried beans, cereal and syrup.    We had lived in an apartment and had not lived in our Mobile, AL house for several years.      So having what was clearly planned as a storage space for all those staples we use to stock our kitchen seemed like the bee's knees.  (That is a good thing for all you readers who are many years younger than me.)   

For a while this pantry worked nicely and functioned as intended.     But you know it had to happen.   One day I realized that things had migrated to the back, never to be seen again.     Cans of chili beans, lone jars of mango-chili pepper jelly (given to us as a gift), half a box of raisins (long since petrified into a muy shriveled version of itself), nearly a whole bag of dark brown sugar (easily a substitute for a brick) and assorted remnants of half eaten boxes of cereal (clearly past their prime so that even the birds would not eat it if I tossed it out in the back yard).   Our pantry needed help and fast!  Food was being wasted and ruined.   In addition I would get aggravated when I would discover (by accident) that I had 6 cans of tomatoes but NO tomato sauce when it was the sauce that I really needed to buy. 
 
Nice pantry, but definitely a Black Hole!

                                                           Pantry pre-modification

So I would pull it all out, re-arrange the contents and vow to do better to use up things, never allowing it to mysteriously migrate to the far reaches of the shelves again.     But it is hopeless when the shelves are too deep for me to reach to the back.    Things get shoved back there, not rotated to the front.     The pantry is also dark inside, another factor that makes it extremely hard to see what is in the pantry, no matter where it is located on the shelf.     It would have taken a lot of discipline and determination to stop the inevitable and I had neither.   
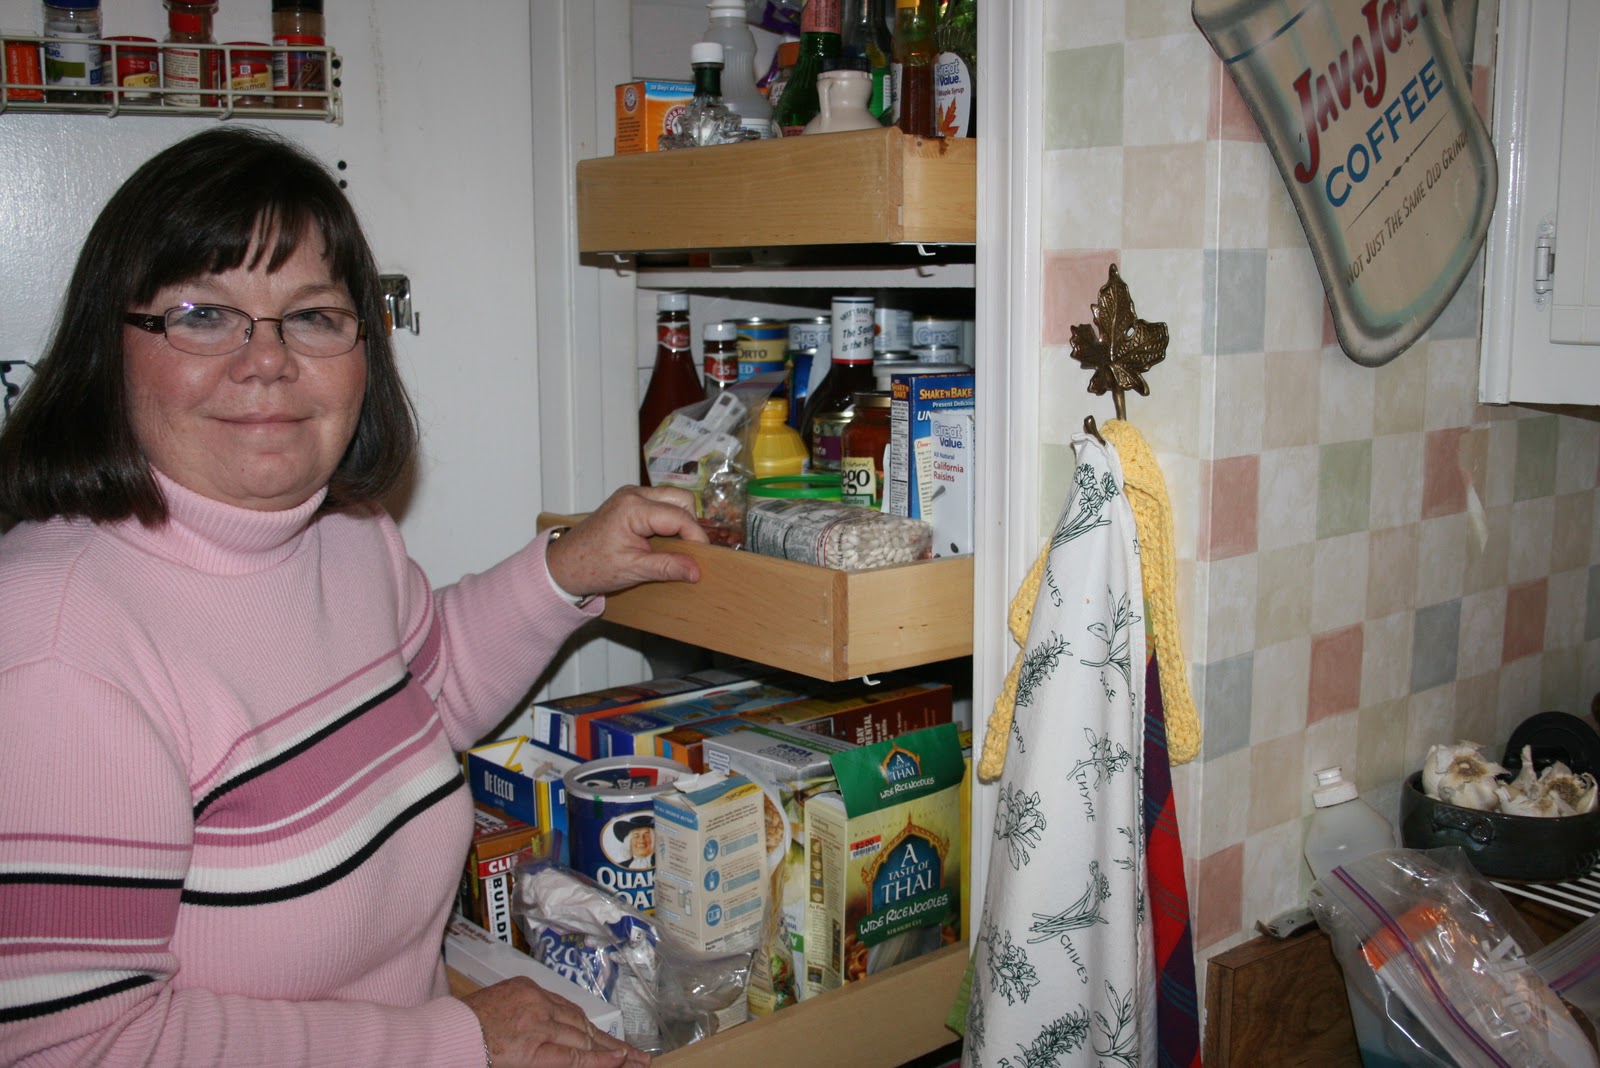
After many complaints and hearing me bemoan the poor design of the pantry, Larry finally heard my pleas.     It also helped that my niece, Rebecca, recently got a makeover to her pantry, a storage place in her kitchen of very similar design to mine.     And what was the solution that turned the black hole (hers and mine) into better storage places for our family larder?     Pull out drawers that sit atop the shelves, thus making things at the back, easily accessible to even a shorty like me.     Yes, there are limitations to this solution, but all in all, we're pretty happy with the way this modification turned out.  

Larry started the process by measuring the shelves and door opening of the pantry.    Then he went to the local building supply company where he found the drawers at a very seasonable price, made out of real wood---Italian Oak!    Then we unloaded the food inside the pantry and discovered before he could do anything else, he would need to paint the walls and shelves.   (He actually asked me if I wanted him to do that!)  Who knew that cans and boxes could leave so many black marks on the walls and shelves?     A quick two coats of an off-white paint to the dingy walls and shelves and he was ready to install the drawers.    
Making measurements and marks for drawer guides

                                     Two coats of paint to cover the black scuff marks.

Next he had to put the runners on the drawers and then make the appropriate marks on the shelves to determine where he needed to screw the runners in place.      Then it was just a matter of installing the drawers in the guide-runners.
 
                                           One drawer installed----three more to go!

Once that was done, it became apparent that the small vinyl covered shelves that hold boxes and bottles of spices on the inside of the door would no longer fit inside the pantry without butting up against the newly installed drawers.     OK, so we didn't think of everything.     That meant moving them up or down slightly so they would fit correctly.    Problem solved at no extra expense.    

The pantry looked nice after I started putting things back inside.     I am still adjusting and figuring out the most logical way to have the food inside, but so far, I am very happy since I can pull out the drawers and actually SEE what is there.      There are spaces along side each drawer where I can put more food and will use those for things like cans of tomatoes that I usually keep in quantity.    I also have put some taller bottles of things like catsup and vinegar that are too tall for the drawers but fit nicely along the sides.

Checking out the contents of the pantry is much easier now.

                                           Drawers pull out so the contents are easily seen.

                                        For right now, things are pretty neat and tidy!

Oh and one other thing.    After Larry put the door back up and the drawers were loaded, shelves filled with the food necessary to keep our kitchen open, I shut the door.    Or at least I tried.   One last little glitch jumped into our faces----the door knob bumped into the drawer directly across from where it entered the pantry.    I was somewhat stumped with what to do about that problem.     Larry took one look, went to his tool box and retrieved a screw driver.  Before long he had the whole problem solved.     Since this is a pantry and no one will ever be on the inside, hoping to get out, he simply removed the inside knob.   Duh, now why didn't I think of that?  The door shuts, doesn't hit the drawer and all is well.     Yay for people like Larry who can see the problem and instantly know what to do to fix it!    And thanks, Larry, for fixing this black hole!

                                         No need for a knob on the inside of the pantry!
So this was one more step in finding the good life. It's amazing how much a little thing like improving storage can raise your mood and make your kitchen a happier place. This entire project took less than two days to complete. It could have been done in a day if we had not had to wait on the paint to dry for a second coat. If you have one of these black holes at your house, I urge you to consider installing some pull out drawers so that the contents can no longer go into hiding, never to be discovered until 3 years after their expiration date!   

                 A happy Marcia inspects the inside of the reformed and transformed pantry.


Happy Trails to you in your search for the good life!

Marcia